Increases (abbreviated inc) are used to shape your knitting and to create lace patterns. An increase is simply adding a stitch to the knitting. There are many ways to make an increase in knitting an many pattern instructions specify which type of increase to use, others do not.
It's important to learn how each increase affects the appearance of your work so you can use the appropriate method.
The most common ways to increase are M1F, M1B, YO and Bar increase.
Make 1 Front (M1F) and Make 1 Back (M1B) are the most discreet and invisible, and match each other symmetrically for the fussy among us.
Yarn Over (YO) is intentionally visible: it creates a decorative hole in the knitting, which is used a lot in lace.
Bar increase are nearly invisible, although there will be a tiny hole.
Make 1 Increase:
To work the make 1 increase (abbreviated m1), you create a new, separate stitch between 2 stitches that are already on the needle.
There are several versions of the "make 1" increase, the simplest is make a backwards loop on the right-hand needle as seen here and on the next row, treat the loop as a separate stitch. It's quick and simple but this increase can show a small hole in your piece of work.
 backward loop between two stitches
 backward loop between two purl stitches
When a pattern says to "make one (M1)" you can use this or one of the following M1 increases (M1F, M1B).
"Make 1 Front" and "Make 1 Back" Increase:
To do a Make 1 Front or Make 1 Back pull the left hand and right hand needle slightly apart. You’ll notice a horizontal strand of yarn, called the running thread, connecting the first stitch on each needle. You use the running thread to make the new stitch. The increased stitch will be a twisted stitch that crosses to the back or to the front and leaves no little hole.
Make 1 Front (M1F) (Left Slant):
With the tip of the left hand needle lift the running thread (the strand between the last knitted stitch and the first on the left needle) to the left hand needle, from front to back. Then, with the right hand needle, knit the strand through the back loop.
(You can turn a make 1 into a decorative, little hole, increase by knitting into the running thread without twisting it).
Make 1 Back (M1B) (Right Slant):
With the tip of the left hand needle lift the running thread ((the strand between the last knitted stitch and the first on the left needle) to the left hand needle, from back to front. Then, with the right hand needle, knit the strand as normal.
 the running thread lift it from front to back (M1F)
You can make 1 increase from the purl side too.
Yarn Over (YO):
Also Known As: yarn forward (yfwd) (yf) (wyif) (yft), yarn over needle (yon), yarn forward and over needle (yon), yarn 'round needle (yrn).
Making a yarn over is a simple way to increase stitches. Using a yarn over makes a hole in the knitting, for this reason, yarn over is a indispensable part of lace knitting and other pieces where open space is intentional or decorative. Also is popularly combined with a decrease such as knit two together to keep the number of stitches the same across the row.
To make a yarn over, you simply wrap the yarn around the right hand needle from back to front counterclockwise before knitting the next stitch. When you get to the yarn over on the next row then work that strand as a regular stitch.
To work a yarn over increase at the beginning of a knit row, bring the yarn to the front of your work (also known as yarn forward), take it over the right hand needle and knit the next stitch of the row. To knit that stitch, move the yarn from the front to the back over the top of the right needle tip while it is inserted into the first stitch. This will create an extra loop of yarn that, on the next row, you can knit as a normal stitch.
To work a yarn over increase at the beginning of a purl row, bring the yarn to the back of your work (also known as yarn back -ybk-) and purl the first stitch of the row. When you knit that stitch, you move the yarn from the back to the front over the right needle to purl this first stitch. This will create an extra loop of yarn that, on the next row, you can purl as a normal stitch.
The instruction ask you to works Yarn Over Twice (yo2) wrap the yarn around the needle from front to back for a single yarn over and wrap the yarn around the needle a second time. Work the next stitch as normal. This make a bigger hole.
Bar Increase: (K1F&B / P1F&B):
The core idea of this increase is to work more than one stitch into an existing stitch. This is a neat and firm increase which makes a little bar on the right side of the work at the new stitch.
The basic way this is done is by working either 2 knit stitches into a knit stitch or 2 purl stitches into a purl stitch.
The bar increase is best for increases worked at the edge of your knitting, where it’ll be enclosed in a seam.
Knit one Front and Back (K1F&B):
1. Knit into the front of the stitch as you normally would, and pull the loop through, but leave the stitch on the left needle.
2. Re-insert the right-hand needle into the back loop of the original stitch and knit it again.
3. Slip the stitch off the left needle making two stitches from one on the right needle .
Purl one Front and Back (P1F&B):
1. Purl into the front of the stitch as you normally would, and pull the loop through, but leave the stitch on the left needle.
2. Re-insert the right-hand needle into the back loop of the original stitch and purl it again.
3. Slip the stitch off the left needle making two stitches from one on the right needle .
To make a double increase using bar increase, mark a center stitch then knit into the front and back of the stitch just preceeding the marked stitch and into the marked stitch itself on each row in which you are to increase.
Lifted Increase:
The lifted increases use the right or left leg of the stitches in the row below (while M1 uses the strand of yarn running between stitches).
You can use a lifted increase at the beginning or end of a row. These increases are nearly invisible, although there will be a tiny hole, about the same or smaller than an M1.
Lifted Increase: Right Slant
1.Insert left needle into back of the stitch below stitch just knitted.
2. Knit this stitch. Continue on your way.
Lifted Increase: Left Slant
1. Knit into the back of stitch (in the "purl bump") in the row directly below the stitch on the needle
2. Knit into the stitch on the needle, then slip both stitches off the needle. Continue on your way.
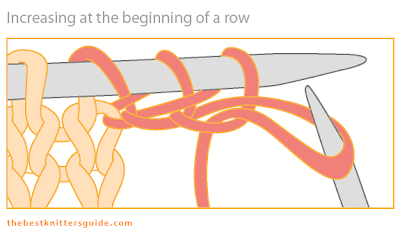
Increasing at the beginning of a row:
When increasing more than one stitch.
Before beginning the row, cast on the designated number of stitches using the "Knitting On Method".


0 comentarios:
Publicar un comentario en la entrada